


Quickly test tower tweaks directly in this build view. Changes are not saved.
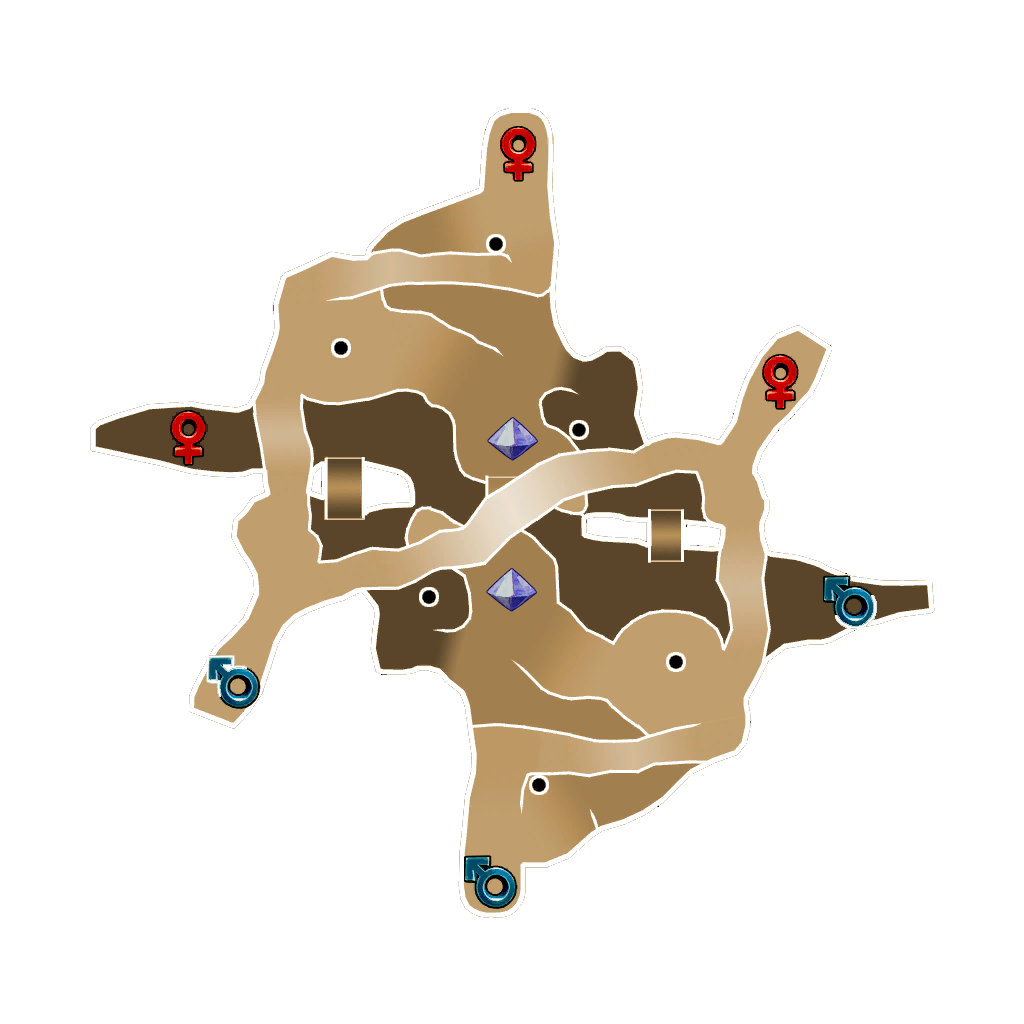
Click on a numbered hint marker on the map to zoom and highlight nearby towers. Double click on map to reset zoom.
No hint selected.
Highlight placed towers (Chrome limitation applies)


Build Status: Public
Difficulty: Nightmare
Game Mode: Survival
Hardcore: Yes
Mix Mode: No
AFK Able: No
Mana Used: 0
Mana to Upgrade: 0
More Builds from [ninja]vanio_ludoto
Hello Defenders!
Everyone attempted Survival more than once on this map, know that it is pretty buggy, and every now and again mobs get stuck on places where it is rather impossible to get to, even if you want to. Anyway, this build I must admit isn't 100% faultless, but I must gladly say, that to me it's proven upto 99% of the waves to go smoothly, without having to wait ages for a stuck mob to die from natural causes eventually.
At 'Hint 4-(UPDATED)' - rarely you can have a mob stuck about there, but at least not off the map and you can summon a minion next to it to get rid of it quickly. With 2 guardian summoners at each stack with Huntress and Monk guardians are a good option for Armour farming.
'Hint 5-(UPDATE) However, it turns out, if You bring a 3rd GuardSummoner with DPS pets, or I personaly used 2 Appr guardians, the build performes even better, and on 5K-6K builders stats, You should NOT GET ANY STUCK mobs, at all, 22-35.
Video: https://youtu.be/x2tExIKqr24
Hint 1 - in the middle of the 4DU TBBeam place 2 Seed bombs 1 facing North, 1 facing South and stack the Nature pylon on top of them (as 4DU Buff Beam is a bit short, very often if you place the Hermit towers first it can be a pain to place the App towers at both ends of the beam, so I normally go for the App towers first and then it is easy to stick the Hermit towers in the middle)
Hint 2 - obviously, at both ends of the Buff beam you have 2 stacks containing 1 DST (facing North and South respectivelly) and 4 LTs.
Hint 3 - for the Aura stacks, depending on your Monk's Aura range, is best if you place them at the far end of the crystalls, the further the better, and at the same time, close enough to both ends of the bridge, making sure that your Monk Guardian can enlarge them to reach your Nature Pylon range.
Pretty fast and easy build, worked well for me I hope it works for You too!
Stats required to be fully AFK during the waves would be about 6K. If your stats are below 6K bare in mind that You may have to flash heal frequently when some of the Robots make their way close enough to damage the tower stacks through the Reflects.
*SSS - Split Stack Survival
*+FPS - FPS FRIENDLY. (Provides better performance, in this case Golem is not used)
Steam - [ninja]vanio.ludoto
Discord - domischief__
Thanks! Enjoy!
Changelog: 10.11.2024, Changelog: 23.11.2024
09 November 2024
Works for me. Using 2 buff summoners with atkrate and range pets and 1 DPS summoners with 2 eyes
10 November 2024
If your Hermit has at least 4k Tower range you can try and use 2 summoners only with Huntress and Apprentice guardians,. as you can see in the video. And thanks for the feedback! Appreciate it! Cheers